Why These Simple No-Bake Peanut Butter Bars Are a Family Favorite
Few desserts evoke the warmth of home and cherished memories quite like classic no-bake peanut butter bars. These unassuming squares, with their rich, creamy peanut butter base and smooth, decadent chocolate topping, are more than just a sweet treat; they're a testament to the power of simplicity and the joy of shared indulgence. For countless families, including our own, they’ve become a steadfast favorite, gracing holiday tables, birthday celebrations, and everyday moments that call for a touch of sweetness. Their enduring appeal lies in a perfect storm of nostalgia, effortless preparation, and an undeniably addictive flavor profile that keeps everyone coming back for more.
Unlike elaborate confections that demand hours in the kitchen, these classic no-bake peanut butter bars are a beacon of ease. They require no oven, just a handful of pantry staples, and a few simple steps, making them an accessible delight for bakers of all skill levels. Whether you’re a seasoned dessert maker or just starting your culinary journey, these bars promise a foolproof path to deliciousness. Join us as we explore why these beloved treats have earned their place as a permanent fixture in family dessert traditions.
The Undeniable Allure: Why No-Bake Peanut Butter Bars Reign Supreme
What makes these simple no-bake peanut butter bars so incredibly popular? It boils down to a few key factors that resonate deeply with anyone who appreciates good food and good times.
- A Taste of Nostalgia: For many, these bars are synonymous with childhood. They evoke memories of holiday gatherings, school bake sales, or special occasions when Mom or Grandma would whip up a batch. The simple combination of peanut butter and chocolate is a flavor pairing that transcends generations, offering a comforting familiarity that's hard to beat. They often replace more traditional birthday cakes in families because of this strong, beloved connection.
- Effortless Simplicity: In a world that often demands complexity, the straightforward nature of these bars is a breath of fresh air. They don’t require fancy equipment, obscure ingredients, or advanced baking techniques. This ease of preparation means more time enjoying the company of loved ones and less time stressing in the kitchen. The magic truly lies in their unpretentious charm.
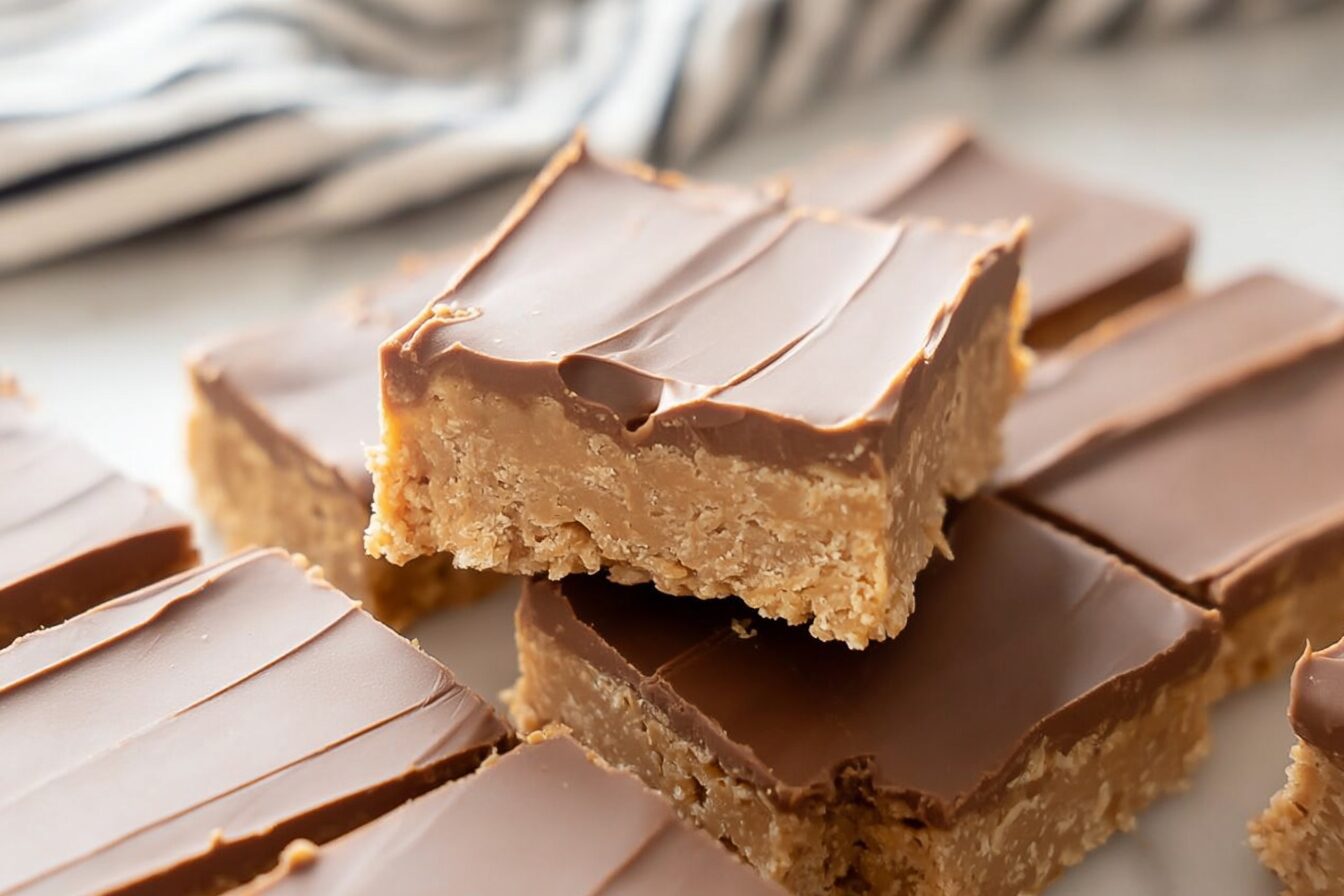
- Irresistible Flavor and Texture: Let's be honest, the primary reason for their popularity is simply how incredibly good they taste. The base is a perfect balance of crumbly graham crackers, rich peanut butter, and just the right amount of sweetness, all bound together with melted butter. This creates a dense, chewy texture that perfectly complements the smooth, melt-in-your-mouth chocolate topping. The sweet and salty dance between the peanut butter and chocolate is a culinary masterpiece that satisfies every craving.
- Universal Appeal: These classic no-bake peanut butter bars are almost universally loved. They’re a guaranteed crowd-pleaser at potlucks, parties, or casual family dinners. There’s something inherently appealing about the combination of flavors and textures that few can resist, making them a go-to for hosts and guests alike.
Crafting Your Own Batch: A Simple Guide to No-Bake Peanut Butter Bar Perfection
The beauty of these easy no-bake peanut butter bars lies in their straightforward method. With just a few pantry staples and minimal effort, you can create a tray of deliciousness that will disappear faster than you can say "peanut butter and chocolate."
Gathering Your Simple Staples
You’ll only need a handful of common ingredients to bring these bars to life:
- Graham Cracker Crumbs: The foundational element, providing a delightful crumbly texture. You can buy them pre-crushed or make your own.
- Creamy Peanut Butter: The star of the show! Opt for a smooth, traditional peanut butter for the best texture and flavor. Natural peanut butter can sometimes be too oily, impacting the consistency.
- Powdered Sugar: Essential for sweetness and creating that smooth, dense texture in the base.
- Melted Butter: The binding agent that brings the base ingredients together, adding richness and helping the bars set.
- Chocolate Chips: For the luscious topping. Semi-sweet or milk chocolate are classic choices, but dark chocolate can also be used for a more intense flavor.
- Optional: A touch of extra peanut butter for the topping: Many find that adding a small amount of peanut butter to the melted chocolate creates a smoother, more spreadable ganache-like topping that is less prone to cracking when sliced. This is a game-changer!
Building the Dreamy Peanut Butter Base
This is where the magic begins:
- Crush the Graham Crackers: Achieving fine, even crumbs is key for a cohesive base. A food processor makes quick work of this, but if you don't have one, simply place the crackers in a sturdy zip-top bag and crush them with a rolling pin until they resemble fine sand.
- Combine the Base Ingredients: In a large bowl, mix the graham cracker crumbs, powdered sugar, melted butter, and peanut butter. Stir until everything is thoroughly combined and there are no dry spots. The mixture should be thick and uniform.
- Press Firmly into Pan: Transfer the mixture to a jelly roll pan or a rimmed baking sheet (usually 9x13 inches works well). This step is crucial: take your time to press the mixture down firmly and evenly across the entire surface. This ensures the bars hold their shape beautifully when sliced and don't crumble apart. Use the back of a spoon, a flat spatula, or even your hands (lined with parchment paper to prevent sticking) to get a compact, smooth layer.
The Silky Smooth Chocolate Topping
The crowning glory of your classic no-bake peanut butter bars:
- Melt the Chocolate: In a microwave-safe bowl, melt the chocolate chips in 30-second intervals, stirring after each, until smooth and glossy. Alternatively, use a double boiler for a gentler melt. If using the optional extra peanut butter for the topping, stir it in with the melted chocolate until fully incorporated and smooth. This creates a slightly softer, creamier topping that cuts like a dream.
- Spread Evenly: Pour the melted chocolate mixture over the peanut butter base. Gently spread it out with an offset spatula or the back of a spoon until it forms a uniform, smooth layer.
- The Essential Chill: This is arguably the most important step for no-bake bars. Place the pan in the refrigerator for at least 2-3 hours, or until the chocolate topping is completely set and firm. This chilling time allows the bars to solidify, making them easy to slice cleanly.
Tips, Tricks, and Creative Twists for Your No-Bake Masterpiece
While the basic recipe for no-bake peanut butter bars is wonderfully simple, a few insights and optional variations can elevate your batch from great to absolutely legendary.
- The Art of Even Pressing: As highlighted in family lore, the secret to perfectly structured bars often lies in how meticulously the base is pressed. Aim for uniform thickness and firmness. This not only ensures a consistent texture in every bite but also prevents the bars from crumbling when you cut them. A flat-bottomed glass or a measuring cup can be helpful tools here.
- Peanut Butter Pointers: While creamy, traditional peanut butter is ideal for the base, don't be afraid to experiment with other nut butters for a twist! Almond butter or cashew butter can offer a different flavor profile, though they might alter the texture slightly. Avoid "natural" peanut butter with oil separation as it can make the base too greasy or crumbly.
- Chocolate Choices: Don't limit yourself to just semi-sweet chocolate. Try a mix of milk chocolate and dark chocolate for a more complex flavor, or even a layer of white chocolate for a striking visual contrast. A sprinkle of sea salt flakes over the still-wet chocolate topping enhances the sweet and salty dynamic beautifully.
- Beyond Graham Crackers: While graham crackers are classic, you can experiment with other crumbly cookies. Vanilla wafers, digestive biscuits, or even crushed pretzels (for an extra salty crunch) can be interesting alternatives that add their own unique character to the base.
- Storage Savvy: These classic no-bake peanut butter bars keep well in an airtight container in the refrigerator for up to a week. For longer storage, they freeze beautifully for up to 2-3 months. Cut them into individual squares before freezing, then thaw them at room temperature for about 15-20 minutes before serving. This is an excellent way to always have a delicious treat on hand for unexpected guests or sudden cravings!
- Personalize with Toppings: Before the chocolate sets, consider adding a sprinkle of mini chocolate chips, colorful sprinkles, chopped peanuts, or a drizzle of contrasting melted chocolate (like white chocolate over dark).
Conclusion
There’s an undeniable magic to no-bake peanut butter bars. They effortlessly bridge the gap between simple ingredients and profound satisfaction, delivering a nostalgic treat that delights both young and old. Their ease of preparation, combined with their irresistible blend of creamy peanut butter and rich chocolate, makes them a perennial family favorite and a perfect choice for any occasion, big or small. Whether you’re continuing a beloved family tradition or starting a new one, these bars are a delicious invitation to slow down, savor a sweet moment, and create lasting memories. So, next time you’re in need of a dessert that promises maximum flavor with minimal fuss, look no further than these timeless, cherished squares. They truly are the definition of a simple pleasure, perfected.
